of the Finger Lakes, Rochester, and Ithaca, NY.
| |
Ruth's Waterfalls of the Finger Lakes, Rochester, and Ithaca, NY. |
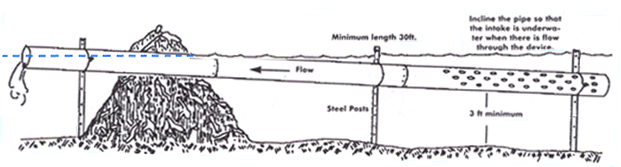
The ProblemBeavers had built a dam in the Lindsay-Parsons Biodiversity Preserve of the Finger Lakes Land Trust.The dam blocked the Cayuga Inlet near the headwaters of the watershed and the resulting pond threatened to flood the Norfolk Southern railroad bed adjacent to the pond. The railroad had removed the dam with a backhoe the previous fall, but the beavers rebuilt the dam over the summer. When we observed the dam in October, the dam was approximately 6 feet high and about 20 feet long impounding a pond of about 3 acres. There was concern that removing the dam late in the year would result in the death of the beavers since they would not be able to rebuild or find another home before winter. In consultation with a DEC wildlife specialist, we decided to install a "beaver dam drain tube" to control the level of the pond such that both the beavers and the railroad would be happy. The general principle is shown in this illustration taken from the NYS DEC Website: http://www.dec.ny.gov/animals/6992.html. This is also called a Water Level Control Devices (WLCD).
With this approach, the beavers are free to continue to raise the dam, but the level of water in the pond, during normal stream flow, will remain at the level determined by the outflow end of the culvert. The intake end is always under water since it is lower than the outflow end of the culvert. This means that there is no sound of running water at the intake end. The holes in the intake end diffuse the flow and reduce the sensation of current flow. It is the sound of running water and sensation of current flow that stimulates the dam building behavior of the beaver. In addition, it is more difficult for the beaver to plug the intake end since it is in deep water and the beaver cannot stand on the pond bottom to do the work. Evidently, the beaver do not worry about the sound and flow at the outlet end of the culvert since it is below the dam. In any case, it would be difficult for the beaver to reach the outlet end of the pipe. Installation of the beaver dam drain tubeWhat follows is a
description of how we built the beaver dam
drain.
We purchased two 8' posts for the intake end of the culvert. The planned water level was 6' and we hoped to pound the posts 2' into the bottom. This worked fine with top of the posts just at the surface of the water. We pounded the posts so that they were perpendicular to the culvert with the holes facing the intake end. We positioned them about 18 inches from the end of the culvert. Both posts twisted on their axis slightly as we pounded them but there is enough flex so that we could force them back perpendicular to attach the cross support.
We used 1-1/4" pre-punched angle iron for the cross supports from the local hardware store. We cut two 4-foot pieces in half and used three pieces for cross supports. The fourth piece was a spare. We also got a 4-foot piece of 1-1/4 prepunched flat steel strap. On the intake end, we bolted one of the cross supports to one leg at the desired level of the top of the culvert. We decided to make this about 4" below the planned water level. If the weather had been a bit warmer, we would have made this about 6" below the surface. This has to be attached under water since you can't use the post driver once it is attached. We then forced the culvert down and attached the other end of the cross support to the other post.
We did not want to put a cross support below the culvert since this would mean working 18" below the surface. That means very long arms or else swimming. The buoyancy of the culvert holds it up against the top support so we are not sure that a bottom support is needed. But is seemed like a good idea to run the steel strap around the bottom. We put a ¼-turn twist in one end and bolted it to the top of one post. We had tied a string through the other end of the strap and were able to pull it underneath and around the culvert and then attach it to the other post. In this way, we were able to install the strap support under the pipe without having to work underwater.
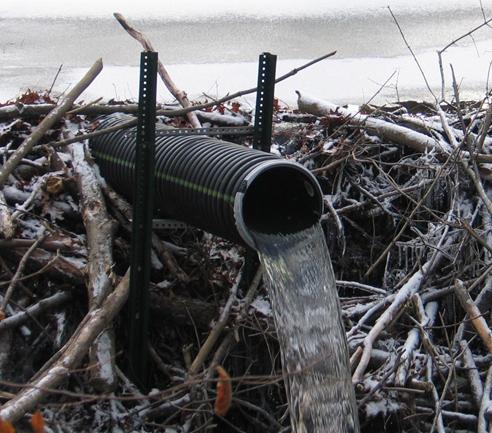
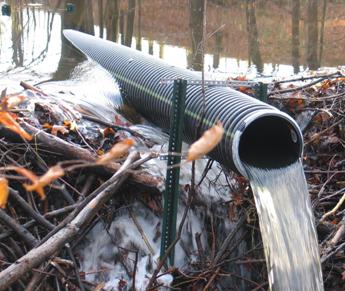
We returned after two weeks having decided to raise the level of the outlet by 3 inches. This had the effect of raising the level of water in the pond by about the same amount. We had had some concern that the level of the pond was not sufficiently high to permit the beavers to enter their den once the pond was frozen. We removed the cross supports at the outflow end and attached the two 4-foot sections of sign post to the top of the 8-foot posts that had been driven into the dam. We had planned to use 3/8 x 1" bolts for this, the same as we had for attaching the cross bars to the posts, but the hardware store was out of them. We purchased 1-1/2 inch bolts instead. This was quite fortuitous since the two pieces of U-channel do not fight tightly together and 1-inch bolts would not have worked. You can see the raised culvert in this picture (notice how the beavers have raised the dam and grouted around the culvert).
Materials
Tools
More photos at http://Waterfeller.com/FLLT/BeaverDamDrain
|
![]()
![]()
![]()
![]()
Send feedback
with questions or comments about this web site.
Copyright © 1998
- 2006, Ruth's Waterfalls of the Finger Lakes and Rochester,
NY, All rights
reserved
Last modified: 02-Aug-2010
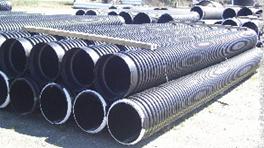 We used 20' x
12" plastic, double-walled culvert from Johnny's Wholesale. The
double-walled has a smooth layer on the inside and the ribbed layer on the
outside. This culvert is available with holes or without. We used the culvert
without holes and drilled our own holes just at the intake end. The culvert
with holes has holes for the whole length and would not work.
We used 20' x
12" plastic, double-walled culvert from Johnny's Wholesale. The
double-walled has a smooth layer on the inside and the ribbed layer on the
outside. This culvert is available with holes or without. We used the culvert
without holes and drilled our own holes just at the intake end. The culvert
with holes has holes for the whole length and would not work.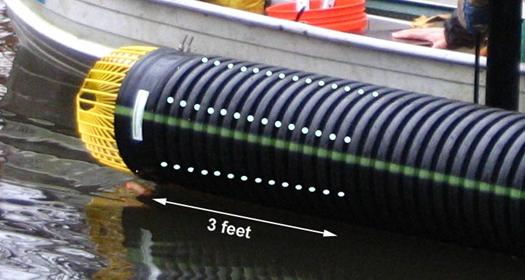 We drilled ½" holes in the
valleys between the ribs using a spade bit and a portable drill. We ended up
with six rows of holes spanning approximately 3 feet at the intake end of the
culvert (shown exaggerated in the photo right). We could have doubled the
number of rows, but believe that the 3-feet was correct to keep all holes under
water at the intake end.
We drilled ½" holes in the
valleys between the ribs using a spade bit and a portable drill. We ended up
with six rows of holes spanning approximately 3 feet at the intake end of the
culvert (shown exaggerated in the photo right). We could have doubled the
number of rows, but believe that the 3-feet was correct to keep all holes under
water at the intake end.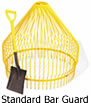 We also used a 12"
Yellow bar guard, from Johnny's Wholesale. (The shovel shown in this picture
of
a large diameter model is not part of the guard.) We installed this in the
female end of the culvert using 1-1/2" stainless-steel U-bolts. We
drilled two holes near the end of the pipe and then managed to insert the U-bolt
around one of the bars from the inside by reaching between the bars with two
fingers. The U-bolt is just inside the circumference band (on the intake side
of the band) and so traps the bar guard in the end of the culvert. We installed
two of these U-bolts on opposite ends of the diameter. You will definitely want
to do this on dry land.
We also used a 12"
Yellow bar guard, from Johnny's Wholesale. (The shovel shown in this picture
of
a large diameter model is not part of the guard.) We installed this in the
female end of the culvert using 1-1/2" stainless-steel U-bolts. We
drilled two holes near the end of the pipe and then managed to insert the U-bolt
around one of the bars from the inside by reaching between the bars with two
fingers. The U-bolt is just inside the circumference band (on the intake side
of the band) and so traps the bar guard in the end of the culvert. We installed
two of these U-bolts on opposite ends of the diameter. You will definitely want
to do this on dry land. 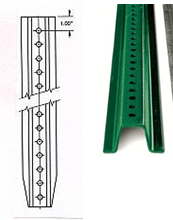 We used "2-pound"
sign posts for support legs from Seneca Supply. We had a post driver that
measured slightly more than 3" in diameter. The posts were also
slightly more than 3" wide and so the drive would not quite fit. We
solved this by pinching the ends together in a heavy-duty vise. Make sure
that the sides are well under 3" for the top 18" (depending on
the length of your post driver).
We used "2-pound"
sign posts for support legs from Seneca Supply. We had a post driver that
measured slightly more than 3" in diameter. The posts were also
slightly more than 3" wide and so the drive would not quite fit. We
solved this by pinching the ends together in a heavy-duty vise. Make sure
that the sides are well under 3" for the top 18" (depending on
the length of your post driver).
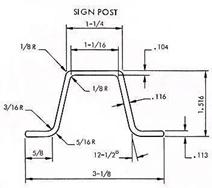 The pre-punched
holes are 3/8" but the paint and burrs on the holes makes it very hard to
insert a 3/8 bolt, particularly when working under water. We wished we had
drilled the holes out to a full 3/8" back home. Remember, you do not know
exactly which hole you will be using, so you need to redrill several of them in
the expected range.
The pre-punched
holes are 3/8" but the paint and burrs on the holes makes it very hard to
insert a 3/8 bolt, particularly when working under water. We wished we had
drilled the holes out to a full 3/8" back home. Remember, you do not know
exactly which hole you will be using, so you need to redrill several of them in
the expected range.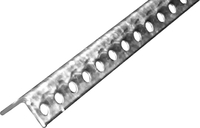 For the outlet end, we purchased
two 4-foot sections and two 8-foot sections. We had planned to pound the 4-foot
sections into the stream bed below the dam and then bolt the 8-foot sections to
them with the tops of the resulting posts about 8 feet above the stream bed.
However, we ended up driving the 8-foot sections into the base of the dam
itself and did not use the 4-foot sections. However, if we decide to raise the
outlet end slightly, we will need to add these shorter sections to the top of
the existing posts.
For the outlet end, we purchased
two 4-foot sections and two 8-foot sections. We had planned to pound the 4-foot
sections into the stream bed below the dam and then bolt the 8-foot sections to
them with the tops of the resulting posts about 8 feet above the stream bed.
However, we ended up driving the 8-foot sections into the base of the dam
itself and did not use the 4-foot sections. However, if we decide to raise the
outlet end slightly, we will need to add these shorter sections to the top of
the existing posts.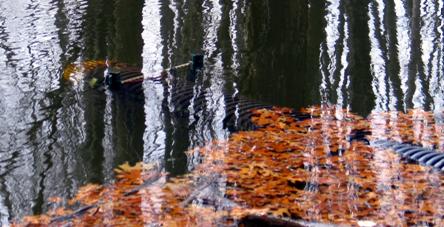
 On the outflow
end, we were able to install angle iron between the two posts under the
culvert. Since water was flowing through the culvert, we used a board as a
lever to lift the end up to the desired level. (Remember, the bottom of the
outflow end of the culver will determine the water level.) We then bolted
another cross support across the top of the culvert. It was a bit of a job to
align the holes for the last bolt, but we managed it by installing an extra bolt
through the angle iron and then using Vise-grips around the bolt head and the
U-Channel post to draw the top of the posts together enough to align the holes.
On the outflow
end, we were able to install angle iron between the two posts under the
culvert. Since water was flowing through the culvert, we used a board as a
lever to lift the end up to the desired level. (Remember, the bottom of the
outflow end of the culver will determine the water level.) We then bolted
another cross support across the top of the culvert. It was a bit of a job to
align the holes for the last bolt, but we managed it by installing an extra bolt
through the angle iron and then using Vise-grips around the bolt head and the
U-Channel post to draw the top of the posts together enough to align the holes.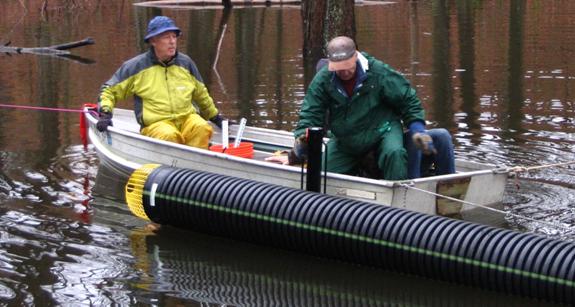 We worked from an aluminum rowboat. We tied a long rope
around a tree in the middle of the pond and attached this to the bow of the
boat using a prussic knot. We had two other ropes from each side of the stern
leading diagonally to helpers on the shore. By getting all three ropes taught,
we could hold the boat fairly securely in the position we needed to work on
each part of the intake supports. We were able to adjust our distance from the
dam by sliding the prussic knot and the helpers on the shore used a turn around
a tree to adjust the lateral tension.
We worked from an aluminum rowboat. We tied a long rope
around a tree in the middle of the pond and attached this to the bow of the
boat using a prussic knot. We had two other ropes from each side of the stern
leading diagonally to helpers on the shore. By getting all three ropes taught,
we could hold the boat fairly securely in the position we needed to work on
each part of the intake supports. We were able to adjust our distance from the
dam by sliding the prussic knot and the helpers on the shore used a turn around
a tree to adjust the lateral tension. Most of what we
needed to do the job does not float. We had prepared a number of string floats
that we tied to the posts as we were installing them. We also tied them around
our tools. If we had dropped anything we could have retrieved it with the
string. As it was, we ended up losing a socket wrench since the socket was not
attached to the driver securely even though we had a string tied to the driver
handle. Fortunately, we had a second one for holding the bolt heads and we were
able to use this to tighten the nuts holding the bolt heads with the Vise-Grips.
Most of what we
needed to do the job does not float. We had prepared a number of string floats
that we tied to the posts as we were installing them. We also tied them around
our tools. If we had dropped anything we could have retrieved it with the
string. As it was, we ended up losing a socket wrench since the socket was not
attached to the driver securely even though we had a string tied to the driver
handle. Fortunately, we had a second one for holding the bolt heads and we were
able to use this to tighten the nuts holding the bolt heads with the Vise-Grips.